Terraform で Azure Virtual Machine
前回、こちらの記事で VNet と Subnet と SecurityGroup まで作成しました。
今回はその上に Virtual Machine を作成してみたいと思います。
ちなみに、Azure の公式でも Terraform はサポートしており、こちらのページで Virtual Machine(Linux)の構築手順は詳しく掲載されています。
ResourceGroup, VNet, Subnet
まずは、ベースとなる Virtual Network と Subnet を作ります。
# Create a resource group
resource "azurerm_resource_group" "test01" {
  name     = "atsushi.koizumi.test01"
  location = "East US"
  tags = {
    "Owner" = "koizumi",
    "Env"   = "test01"
  }
}

# Create a virtual network within the resource group
resource "azurerm_virtual_network" "vnet01" {
  name                = "vnet01"
  resource_group_name = azurerm_resource_group.test01.name
  location            = azurerm_resource_group.test01.location
  address_space       = ["10.7.0.0/16"]
  tags = {
    "Owner" = "koizumi",
    "Env"   = "test01"
  }
}

# Create 1 Subnet within the virtual network
resource "azurerm_subnet" "subnet01" {
  name                 = "subnet01"
  virtual_network_name = azurerm_virtual_network.vnet01.name
  resource_group_name  = azurerm_resource_group.test01.name
  address_prefixes     = ["10.7.1.0/24"]
}
Security Group
続いてセキュリティグループを2つ作成します。なぜ、2つ必要になるかと言うと、以下の図をご覧ください。
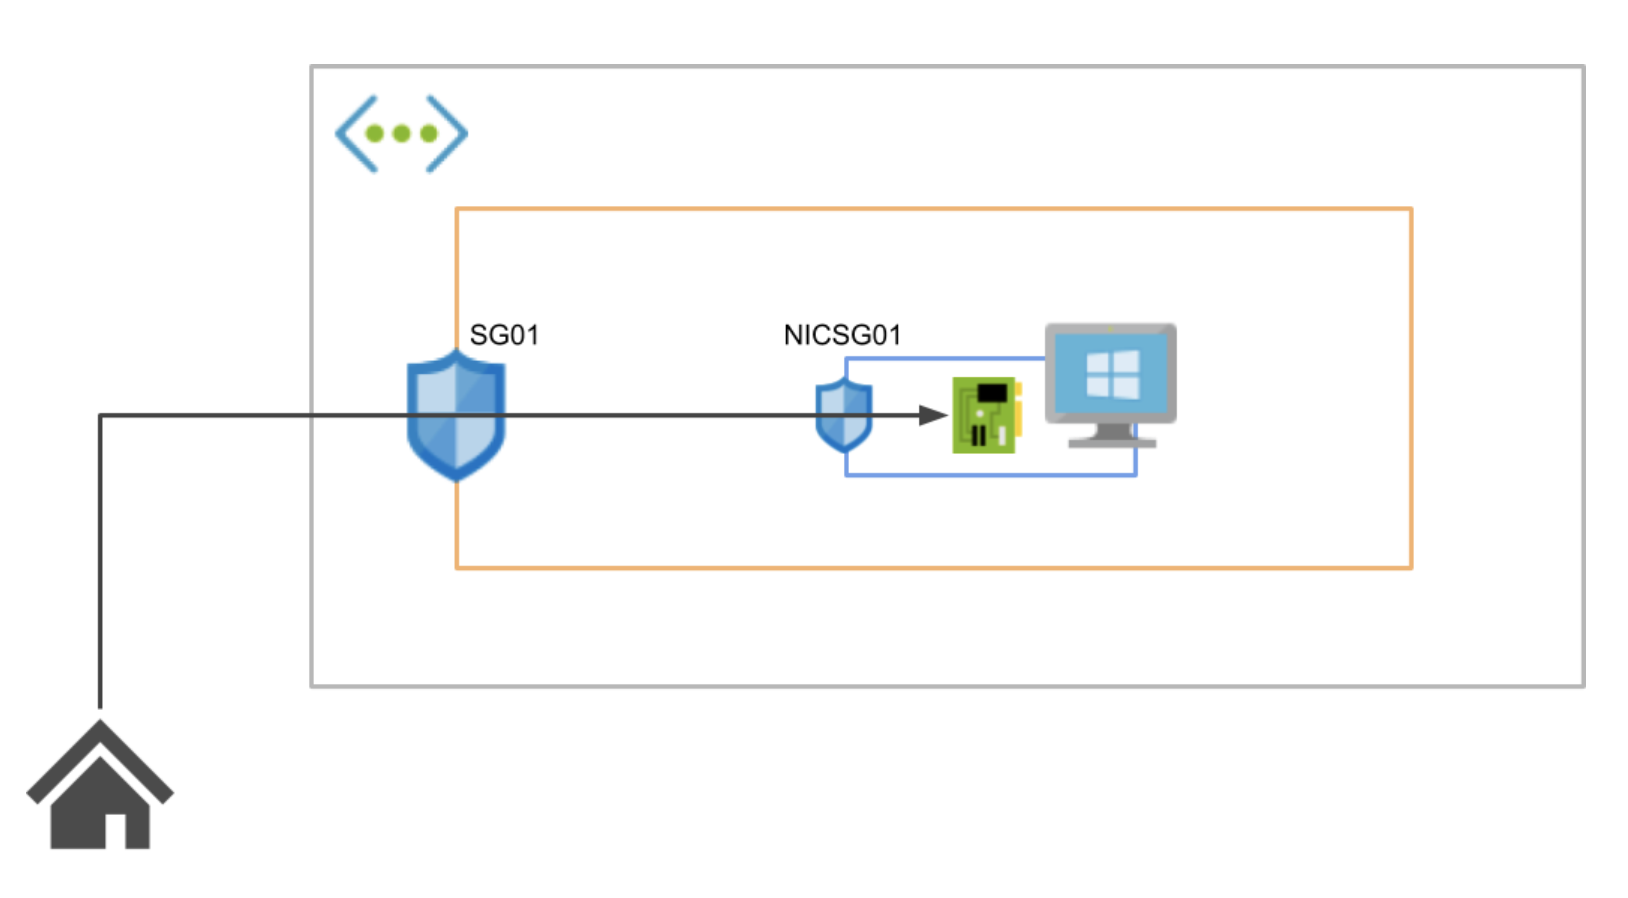
図のように、セキュリティグループはサブネット用とネットワークインターフェイスカード用の2つが必要です。設定のポイントは自宅の IP(var.home_ip)からの RDP を許可するよう、両方のセキュリティグループで指定しているところです。
# Create 2 SecurityGroups
resource "azurerm_network_security_group" "sg01" {
  name                = "sg01"
  location            = azurerm_resource_group.test01.location
  resource_group_name = azurerm_resource_group.test01.name
  security_rule {
      name                       = "RDP"
      priority                   = 1001
      direction                  = "Inbound"
      access                     = "Allow"
      protocol                   = "Tcp"
      source_port_range          = "*"
      source_address_prefix      = var.home_ip
      destination_port_range     = "3389"
      destination_address_prefix = "VirtualNetwork"
  }
  tags = {
    "Owner" = "koizumi",
    "Env"   = "test01"
  }
}

resource "azurerm_network_security_group" "nicsg01" {
  name                = "nicsg01"
  location            = azurerm_resource_group.test01.location
  resource_group_name = azurerm_resource_group.test01.name
  security_rule {
      name                       = "RDP"
      priority                   = 1001
      direction                  = "Inbound"
      access                     = "Allow"
      protocol                   = "Tcp"
      source_port_range          = "*"
      source_address_prefix      = var.home_ip
      destination_port_range     = "3389"
      destination_address_prefix = "VirtualNetwork"
  }
  tags = {
    "Owner" = "koizumi",
    "Env"   = "test01"
  }
}

# Associates a Network Security Group with a Subnet
resource "azurerm_subnet_network_security_group_association" "sg01" {
  subnet_id                 = azurerm_subnet.subnet01.id
  network_security_group_id = azurerm_network_security_group.sg01.id
}
ネットワークインターフェイスカード
続いて、ネットワークインターフェイスカードを作成します。外部からの RDP 接続を行うため、Public ip をネットワークインターフェイスカードにアタッチします。
また、先ほど作成したセキュリティグループも一緒にアタッチします。
# Public ip address
resource "azurerm_public_ip" "public01" {
  name                = "public01"
  resource_group_name = azurerm_resource_group.test01.name
  location            = azurerm_resource_group.test01.location
  domain_name_label   = "public01"
  allocation_method   = "Dynamic"
  tags = {
    "Owner" = "koizumi",
    "Env"   = "test01"
  }
}

# Create Network Interface Card
resource "azurerm_network_interface" "nic01" {
  name                = "nic01"
  location            = azurerm_resource_group.test01.location
  resource_group_name = azurerm_resource_group.test01.name
  ip_configuration {
    name                          = "internal"
    subnet_id                     = azurerm_subnet.subnet01.id
    private_ip_address_version    = "IPv4"
    private_ip_address_allocation = "Dynamic"
    public_ip_address_id = azurerm_public_ip.public01.id
  }
  tags = {
    "Owner" = "koizumi",
    "Env"   = "test01"
  }
}

# Connect the security group to the network interface
resource "azurerm_network_interface_security_group_association" "nic01" {
    network_interface_id      = azurerm_network_interface.nic01.id
    network_security_group_id = azurerm_network_security_group.nicsg01.id
}
Virtual Machine
以上で準備が整いましたので、最後は、Virtual Machine の作成です。
VM インスタンス作成の前に
VM 作成の前にどのようなインスタンスサイズが存在するかは、以下の az コマンドで確認できます。"-o table" は出力結果を見やすいテーブル形式にするためのオプションです。
イメージの提供元 publisher の一覧は以下のコマンドで取得できます。
offer の一覧は以下のコマンドで取得できます。
sku の一覧は以下のコマンドで取得できます。
以上の検索を行った上で使用したい image を選択します。
Virtual Machine の構築を開始
インスタンスサイズは Standard_F2、OSイメージ は Microsoft の "2019-Datacenter"、ディスクサイズは 128GB にしています。
# Create Virtual Machine
resource "azurerm_windows_virtual_machine" "vm01" {
  name                = "vm01"
  resource_group_name = azurerm_resource_group.test01.name
  location            = azurerm_resource_group.test01.location
  size                = "Standard_F2"
  admin_username      = "adminuser"
  admin_password      = "xxxxxxxxx"
  network_interface_ids = [
    azurerm_network_interface.nic01.id,
  ]

  os_disk {
    name                 = "vm01_OsDisk_1"
    caching              = "None"
    storage_account_type = "Standard_LRS"
    disk_size_gb         = 128
  }

  source_image_reference {
    publisher = "MicrosoftWindowsServer"
    offer     = "WindowsServer"
    sku       = "2019-Datacenter"
    version   = "latest"
  }
}
ログインしてみる
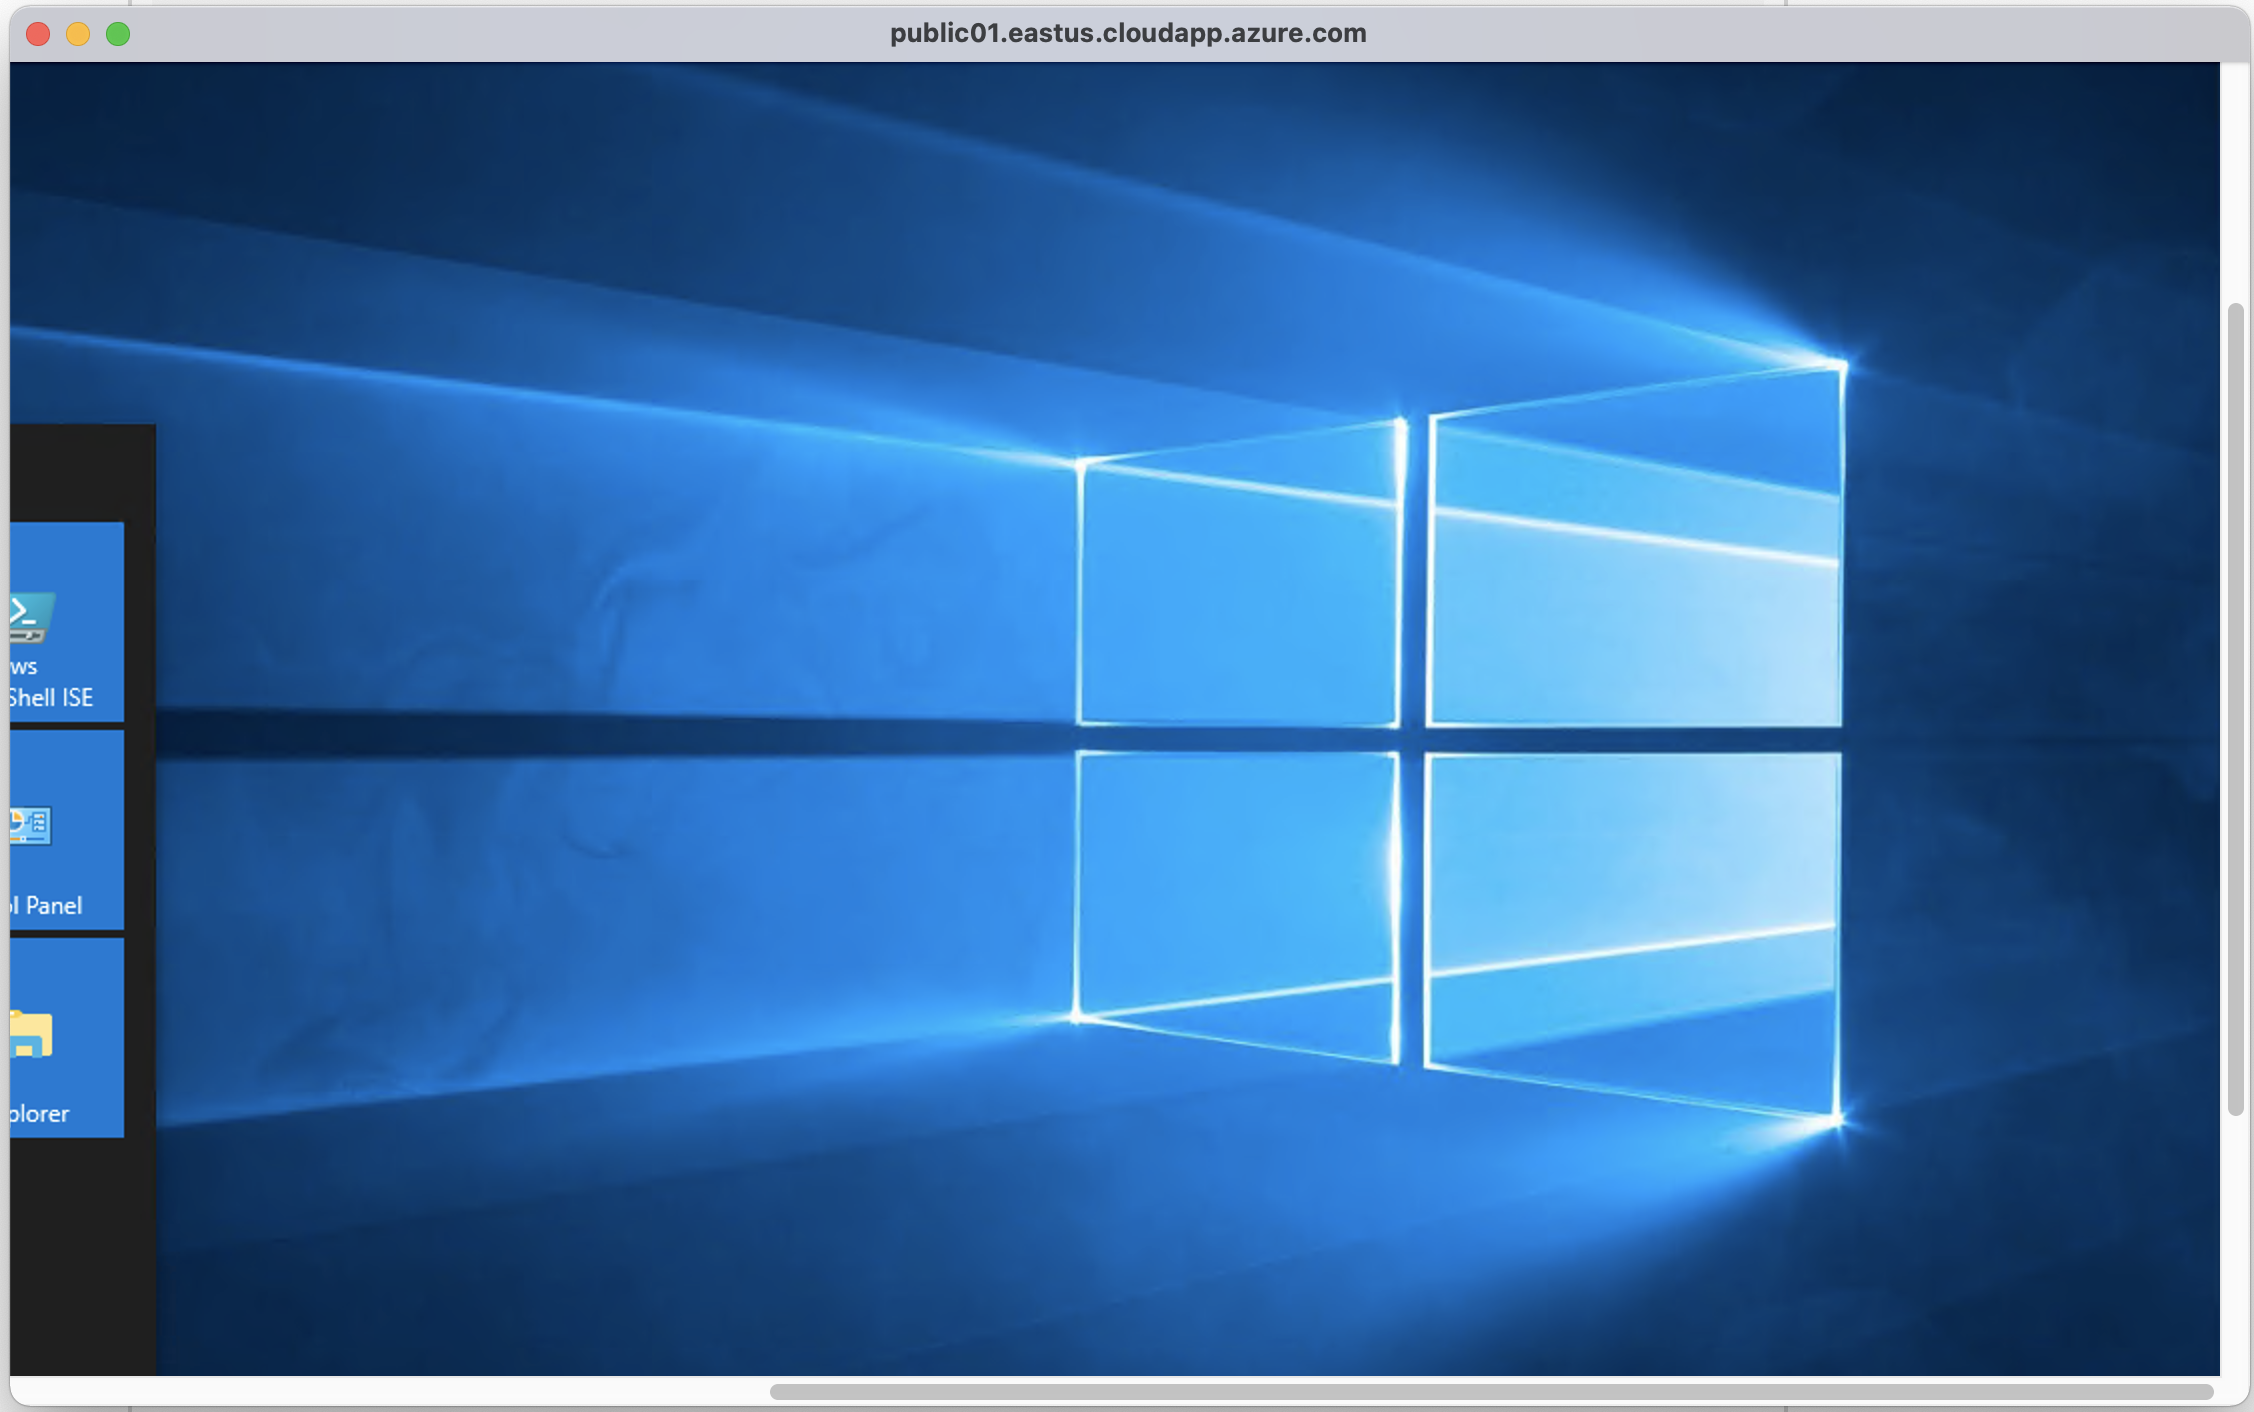
以下の接続情報を用いて RDP 接続します。DNS は azurerm_public_ip で domain_name_label を指定すると作成されます。
- DNS:public01.eastus.cloudapp.azure.com
- User:adminuser
- Pass:xxxxxxxxx
以下のように、ログインすることができました。
気になったこと
Azure 標準の DNS 名は推測されやすいので使用する場合は、接続元の制限などセキュリティを考慮する必要がありそうですね。
また、Azure には、セキュリティグループとは別に、 "アプリケーションセキュリティグループ" というものが存在します。実は、ネットワークインターフェイスカードに付与するセキュリティグループは "アプリケーションセキュリティグループ" の方が管理しやすいらしいです。
この辺の細かいサービスの特徴についても確認していきたいと思います。
今回は以上です。