terraformでmoduleを使ってみる

moduleとは何ぞや
terraformのmodule
実際に使ってみた感想ですが、terraformのmoduleとは、単一ディレクトリ内の.tfファイルと理解して良いと思います。
まずは、理解しやすい構成として以下のようなパターンを考えてみます。
module_A
|--main.tf
|--role.tf
module_B
|--policy.tf
それぞれのrole.tf、policy.tfファイルの内容は以下のような内容です。main.tfの説明は省きます。
module_A/role.tf
# AssumeRole policy
data "aws_iam_policy_document" "instance-assume-role-policy" {
  statement {
    actions = ["sts:AssumeRole"]

    principals {
      type        = "Service"
      identifiers = ["ec2.amazonaws.com"]
    }
  }
}

# iam role
resource "aws_iam_role" "instance" {
  name               = "instance_role"
  path               = "/system/"
  assume_role_policy = data.aws_iam_policy_document.instance-assume-role-policy.json
}
module_B/policy.tf
# iam policy
data "aws_iam_policy_document" "test01" {
  statement {
    sid = "1"

    actions = [
      "s3:ListAllMyBuckets",
      "s3:GetBucketLocation",
    ]

    resources = [
      "arn:aws:s3:::*",
    ]
  }
}

resource "aws_iam_policy" "test01" {
  name   = "test01-policy"
  path   = "/"
  policy = data.aws_iam_policy_document.test01.json
}
module_Aがロールを作成するmoduleで、module_Bがポリシーを作成するmoduleです。
moduleの利点は、他のmoduleを利用できることです。つまり、module_Aからmodule_Bを利用することができます。
module_A/role_v2.tf
こんなふうに書き換えます。
# AssumeRole policy
data "aws_iam_policy_document" "instance-assume-role-policy" {
  statement {
    actions = ["sts:AssumeRole"]

    principals {
      type        = "Service"
      identifiers = ["ec2.amazonaws.com"]
    }
  }
}

# iam role
resource "aws_iam_role" "instance" {
  name               = "instance_role"
  path               = "/system/"
  assume_role_policy = data.aws_iam_policy_document.instance-assume-role-policy.json
}

# module
module "module_B" {
  source = "../module_B/"
}
一番下のmoduleの3行を足しただけです。
これによって、module_B配下のpolicy.tfファイルを利用することができるようになりました。
コマンドを実行して確認しましょう。
これで、module_Aからmodule_Bが利用可能になっていることが確認できましたね。
moduleの本当の利用方法
module間で値の受け渡し
上記の例は、module_Aからmodule_Bをそのまま利用しているだけなので、メリットが感じられませんが、ここからが本番です。
module_Bで定義しているポリシーをmodule_Aのロールにアタッチしてみましょう。
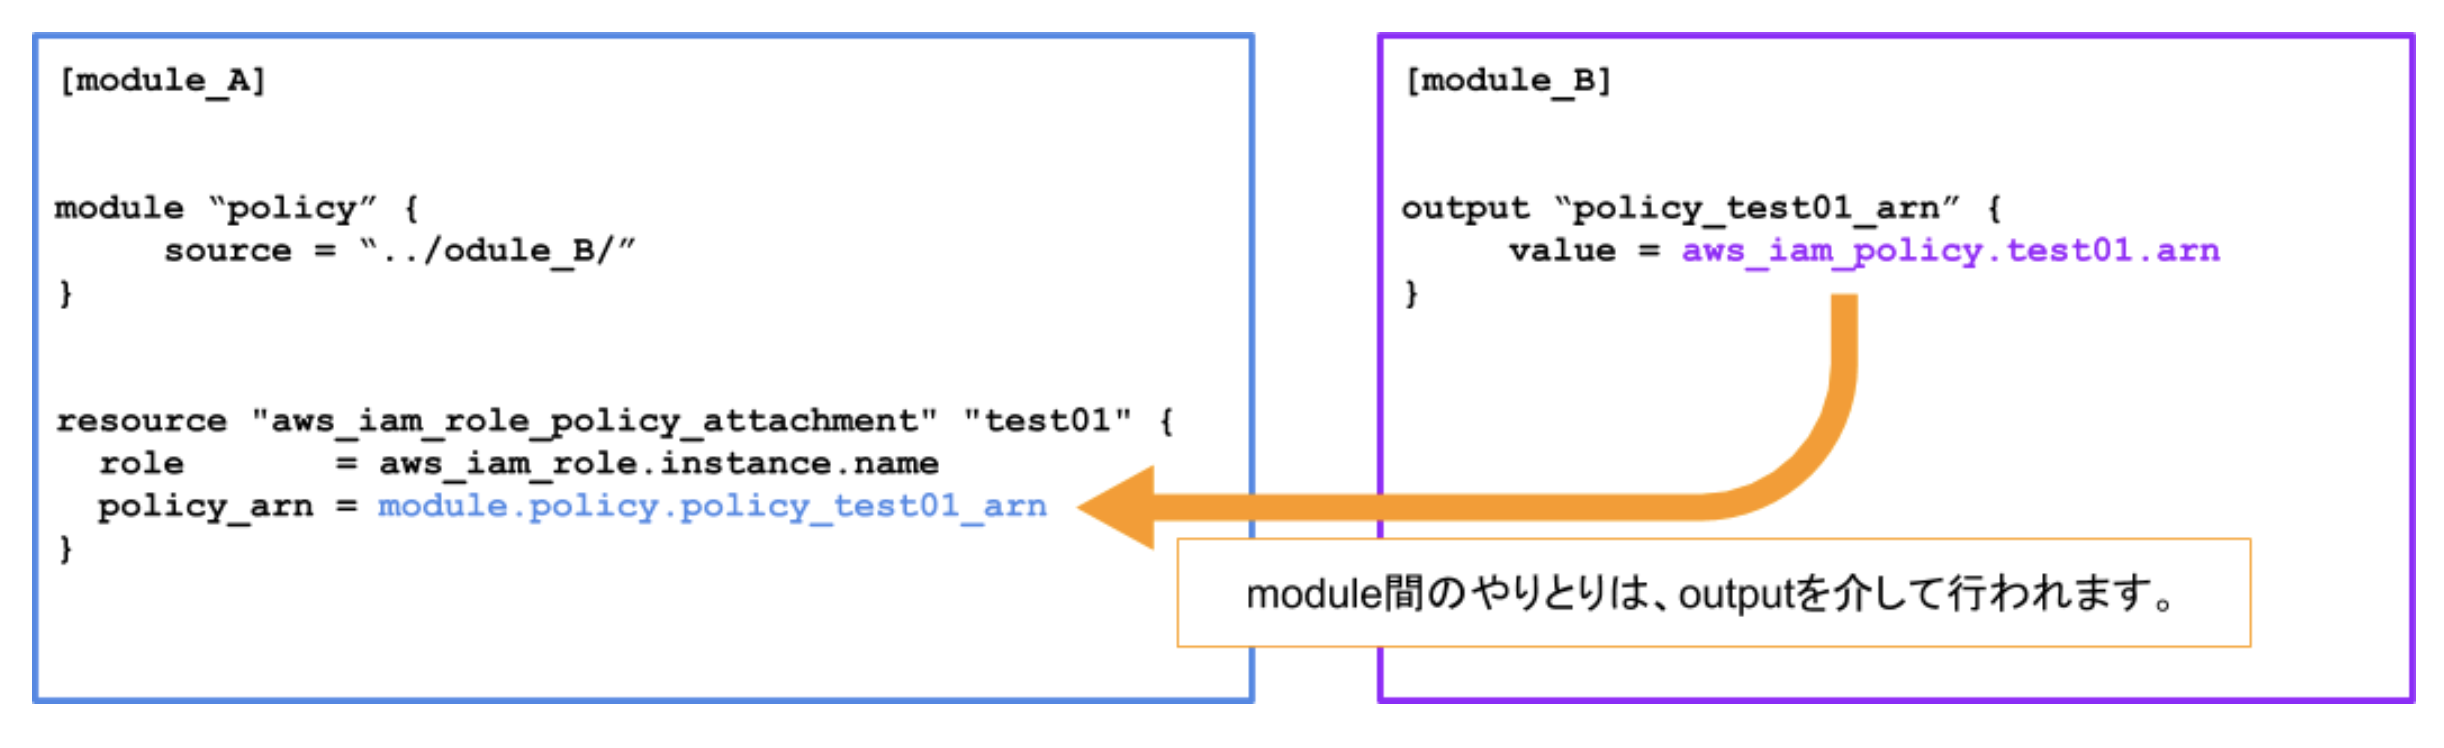
結論から出しますと、module間の値の受け渡しをするために、こんなファイル構成になります。
module_A
|--main.tf
|--role_v2.tf
module_B
|--policy.tf
|--output.tf
module_A/role_v2.tf
# 長くなってしまうため、aws_iam_role部分の記載は省略
# module
module "policy" {
  source = "../module_B/"
}

# attach
resource "aws_iam_role_policy_attachment" "test01" {
  role       = aws_iam_role.instance.name
  policy_arn = module.policy.policy_test01_arn
}
module_B/output.tf
output "policy_test01_arn" {
    value = aws_iam_policy.test01.arn
}
moduke間の値の受け渡しイメージ
module_Bのoutputをmodule_Aで受け取っている状態を表現しますと、こんな感じです。
では、確認してみましょう。
module_Bのポリシーをmodule_A側で利用することができましたね。
このように、outputによる値の受け渡しによって、module間のやりとりが可能となります。
最後に(簡単な紹介)
こんな構成
env
|--dev
   |--main.tf
   |--variable.tf
|--stg
   |--main.tf
   |--variable.tf
|--prd
   |--main.tf
   |--variable.tf
resource
|--ec2.tf
|--policy.tf
|--rds.tf
|--role.tf
|--security_group.tf
|--subnet.tf
|--vpc.tf
dev,stg,prdでは環境変数の定義だけ行い、リソースは定義しません。
resourceでネットワーク、ロール、サーバー、データベースを定義します。
できること
- devの中でterraform applyすれば、開発環境が作成できます。
- stgの中でterraform applyすれば、検証環境が作成できます。
- pedの中でterraform applyすれば、本番環境が作成できます。
最終的にmoduleを利用することで、こんなことまで出来るようになります。すごい便利ですよね〜。
次回は、どういった原理でこの構成が動いているのか、細かく解説していきたいと思います。